Showing posts with label #GrandmaIsLove. Show all posts

Monday, March 21, 2016

Irish Cream Coffee Cake

By: Amy Weinberg


Morning. It’s morning, everyone! Today is the day! The sun is shining, the tank is clean, and we’re gonna get out of…. 

THE TANK IS CLEAN!
Finding Nemo, 2003

But really, the sun is finally shining. The grass is as green as my beer so you know what that means….St. Paddy’s Day! (I originally typed this on my phone and St. Paddy’s autocorrected to St. Party’s – fitting.) There are so many different Irish themed flavors that come alive this time of year, most of them in the form of beer. Even if you’re not at all Irish, you’re a little bit Irish on St. Paddy’s Day. On St. Paddy’s Day, your blood runs green with Bailey’s and artificial food coloring.

Whether you’re entertaining guests, or you just need that perfect midnight, not-so-sober snack, I’ve got the recipe for you.


Irish Cream Coffee Cake


What You'll Need:

For Ganache - 
1/3 cup plus 2 tbsp. heavy cream
1 cup milk chocolate chips
2 tablespoons butter
2 tablespoons Irish Cream liqueur (about half a mini bottle)

For Icing - 
2 sticks unsalted butter, softened
3 cups confectioners' sugar
1/4 cup plus two tablespoons Irish Cream (about 1 1/2 mini bottles)
1 tsp. vanilla extract

For Hot Fudge - 
1/2 cup unsweetened cocoa
1/4 cup milk chocolate chips
1/3 cup plus 1/4 cup granulated sugar
1/2 cup coffee
1/2 cup Irish cream (2 mini bottles)


The first thing you’ll have to make is the chocolate ganache. Combine your heavy cream and chocolate chips in a saucepan and heat on medium low until all chips are melted. Start adding in your butter in chunks and stir until everything is combined. Final step? Add the Irish cream. Once everything is combined, you’re going to want to pop this in the fridge to cool while we make the other components.


Next, you’ll want to make your Irish Cream frosting. First, combine your butter and powdered sugar and mix on low, gradually adding in the Irish cream. Add in your vanilla and beat on high until the frosting is light and fluffy. Clear some room in your fridge because you’re gonna pop this in right next to the ganache.


The final component of this dessert is the Irish Cream hot fudge sauce. Combine and whisk together all of the ingredients over medium heat. Let your sauce bubble for 1 minute and then remove from heat. Once the sauce cools a little bit, pour about ¼ cup into each empty Irish cream bottle.


 Now that all of the components are ready, it is time for the best part: ASSEMBLY. I used a Granny Smith Apple Coffee Cake because it is what I had, but I would recommend using a no-nut cake for this dessert. I would also recommend semi-freezing the cake beforehand so that it is easier to cut out the hole in the middle. Next, take out your ganache and start spooning it into the hole. The ganache should still be warm so it should finish defrosting the cake. Next start filling a piping bag with your Irish Cream icing and pipe it onto the cake, finishing with a dusting of cocoa.


The final step is the hot fudge. If you are serving this as a dessert for other people, I would recommend serving the Bailey's bottle on the side, allowing your guest to make their own mess. In one swift move, you'll have to tip over and insert the mini bottle into the top of the cake. If you're successful, the bottle will stay still while the cake explodes with chocolate. 


And just a friendly reminder - although everyone is Irish on St. Paddy's Day, this is not a dessert for children. I even got a little tipsy tasting each component!

Monday, March 7, 2016

Here Comes The Sun - Ready for Spring Ice Pops

By: Amy Weinberg


If you’re like me, March 1st officially means spring to you. It means flowers are starting to bloom, snowstorms are turning into thunderstorms, and ice pops are once again edible. Yes, there is still snow on the ground. Yes, it still gets dark before 6pm. Yes, playoff basketball hasn’t even started yet. I do not care. To me, March = Spring. While I tend to commit to spring a little early, I understand that t-shirts and ice pops in March may not be for everyone. I’m not here to tell you how to spend your March. I am here to get you JACKED UP about spring and all of the fun desserts we will make to celebrate.

I am going to dive head first with this dessert and go straight for the ice pops. And no, I will not be turning our delicious coffee cake into an ice pop. (Although, if I ever figure out how to do that, you guys will be the first to know.) Instead, I’m going to give you an ice pop that will leave you feeling so great, so refreshed, that you'll be ready for that second slice of coffee cake in no time. 

I mean, who doesn’t love popsicles? They’re cool, refreshing, and you can make them out of just about everything. The ice pops I’m going to be making are even healthy.

What You'll Need:
1 cup spinach, packed
1 mango
1 banana
1 cup fruit juice (something lightly colored - I used Dole Mango, Peach, Banana juice) 
A blender


It probably could not be any easier to make these ice pops. Simply take your spinach, banana, mango, and juice and combine them in a blender. 30 seconds in my new NutriBullet and these pops are ready to freeze. 


Pour the combined ingredients in your popsicle molds, secure the tops, and pop them in the freezer for a few hours. 


As I was making these I was thinking to myself, "Why don't I make ice pops more often? They're incredibly easy to make and they taste great." Only when I tried to pop the ice pops out of the molds did I realize why I don't make ice pops more often. With three pop-less sticks sitting on my counter, I had one chance left to get this popsicle out of its mold and in one piece. 

Luckily, I was able to wiggle that last pop out of its mold.


And let me tell you, these popsicles were DELICIOUS. Who would have thought that frozen, blended up spinach would taste great? Certainly not someone whose desserts normally consist of coffee cake. But here I am, frozen spinach in hand, waiting for that grass in front of me to turn the same color green as the ice pop. 

After finishing my ice pop I turned to my mother to see if she could bestow any of her ice pop knowledge upon me. I remember making an ice pop or two when I was a kid so I figured she MUST have some insider tips to get the rest of them out. The one tip she gave me was so simple, yet so perfect - 

"Uhhh... Just dip the mold in warm water for a few seconds."


Of course it worked perfectly. Moral of the story, every now and then you just have to suck it up and ask your mother for help, even if you know that her response will be sarcastic.

Tuesday, January 5, 2016

New Year, Same Great Coffee Cake

By: Amy Weinberg

Well that was fast, it's 2016! 

It feels like it was 2015 just a few days ago. Hey, what's your New Years Resolution? Mine is the standard 1024 x 768. Okay, enough with the cheap puns. 

A new year means new things. New trends, new resolutions, new gym memberships, and new coffee cake flavors? 

(Just kidding, but we're always trying out new flavors on QVC!)

One trend that isn't going anywhere is the post-holiday health craze. We're all in the same boat here. We all "went to the gym like last week or something." We all are feeling a little bloated, slow, and cranky. We all have a little bit of Brucey in us right now.


The post-holiday food coma is upon us and there isn't anything that anyone can do to stop it; except  *GASP* eating healthy and exercising. There are hundreds of ways to get back on that horse but the first step is always the hardest. 

So being that this is a coffee cake blog, you're probably wondering why I'm on a rant about eating healthy, right? Well, like a few of you I'm sure, my digestive track is a mess. One bite of cake and I'm waiting 10 minutes for the gurgles and pain to subside. Everyone has their reasons to get healthy, mine just so happens to be to eat an occasional dessert. Pain free. That's not too much to ask for, right?

Instead of taking you on a ride full of chocolate, cinnamon, and sugar, today I'm going to do your guts a favor and list foods to eat/stay away from for a speedy recovery. 


GOOD FOR YOUR TUMMY:

  1. Fruits and Vegetables (duh, fruits and vegetables help everything)
  2. Water (because let's be honest, most of us are dehydrated anyways)
  3. Herbs & Spices (ginger, turmeric, & garlic ) 
  4. Organic yogurt (IN MODERATE AMOUNTS)
  5. Cultured Vegetables (sauerkraut & nattoh) 


BAD FOR YOUR TUMMY:
  1. Spicy Foods (again, duh)
  2. Caffeine (don't know if I'll be able to cut this one out) 
  3. Soda
  4. Alcohol 
  5. Dairy (except yogurt IN MODERATE AMOUNTS) 

If you're feeling a little out-of-wack after this holiday season, these lists are for you. Everyone get out there are fix your bodies so that we can fill them with more coffee cake! 


Thursday, November 26, 2015

HAPPY THANKSGIVING!!!

By: Amy Weinberg


'Tis the season for giving, spiked eggnog, and overeating. It's time to chuck the sagging pumpkin face and toss up those holiday lights. Growing up a Jew, I can't speak to the religious aspect of Christmas lights (we stick to 9 candles), but man are they pretty to look at. 

BUT, I am getting a little ahead of myself because tonight is the night that kicks off this 5 week party. Thanksgiving is my favorite holiday not because my birthday falls on it every few years, but because of the atmosphere. Delicious aromas fill the air, every imaginable dog breed is on television, and unbuttoning your pants after dinner is no longer 'frowned upon'. Thanksgiving is for everyone! At a time where tensions are high across the world, it's nice to have a true American holiday. Black or White, Christian or Muslim, West Coast or East Coast, Thanksgiving is for you. Whether you love dog shows (me), football (me), or stuffing yourself with food (me), Thanksgiving is for you. The only qualifications for Thanksgiving are a giving heart and an empty stomach.

(Special shout-out to the Native Americans who let us 'discover' their land)


At the risk of sounding corny, one thing for which I am very thankful is My Grandma's of New England. And no, I'm not talking about the coffee cakes (my waistband certainly isn't thankful for those), but the people who make My Grandma's what it is. I am thankful for the wonderful opportunity provided to me by wonderful people. Coffee cakes aside, this is the sweetest job I've ever had.


A few other things I am thankful for:

  • All of the beautiful cheese you see on that potato above
  • The fact that my entire family somehow prefers white meat 
  • The increasing acceptance of sarcasm as my second language 
  • The air in my lungs and the blood in my veins


Now that the turkey has been (somewhat) consumed and everyone is in a food coma, is it time to start getting in the Christmas Spirit. Whether you see this time of the year as a religious one or not, one thing remains true: no one is kinder than they are in the month of December. 


With that being said, I'll leave you with this challenge:

Never lose that 'Christmas Spirit', whatever that means to you. I know it's hard because the climax that is the end of each year is always followed by the drag of a long winter (for most of us). The only thing shorter than patience during this time is daylight. I get it. Unless you absolutely thrive in below freezing temperatures and snow-walls the size of my house, the first few months of the year are always the toughest. But don't lose that warm, giving spirit on January 1st. It's so easy for your outlook to match the bitterness of the weather, but never lose that warmth. Never lose the generous, loving, inclusive feeling you have right now.

Your prize? A blog next week on what to do with all of that left over coffee cake!

Friday, November 6, 2015

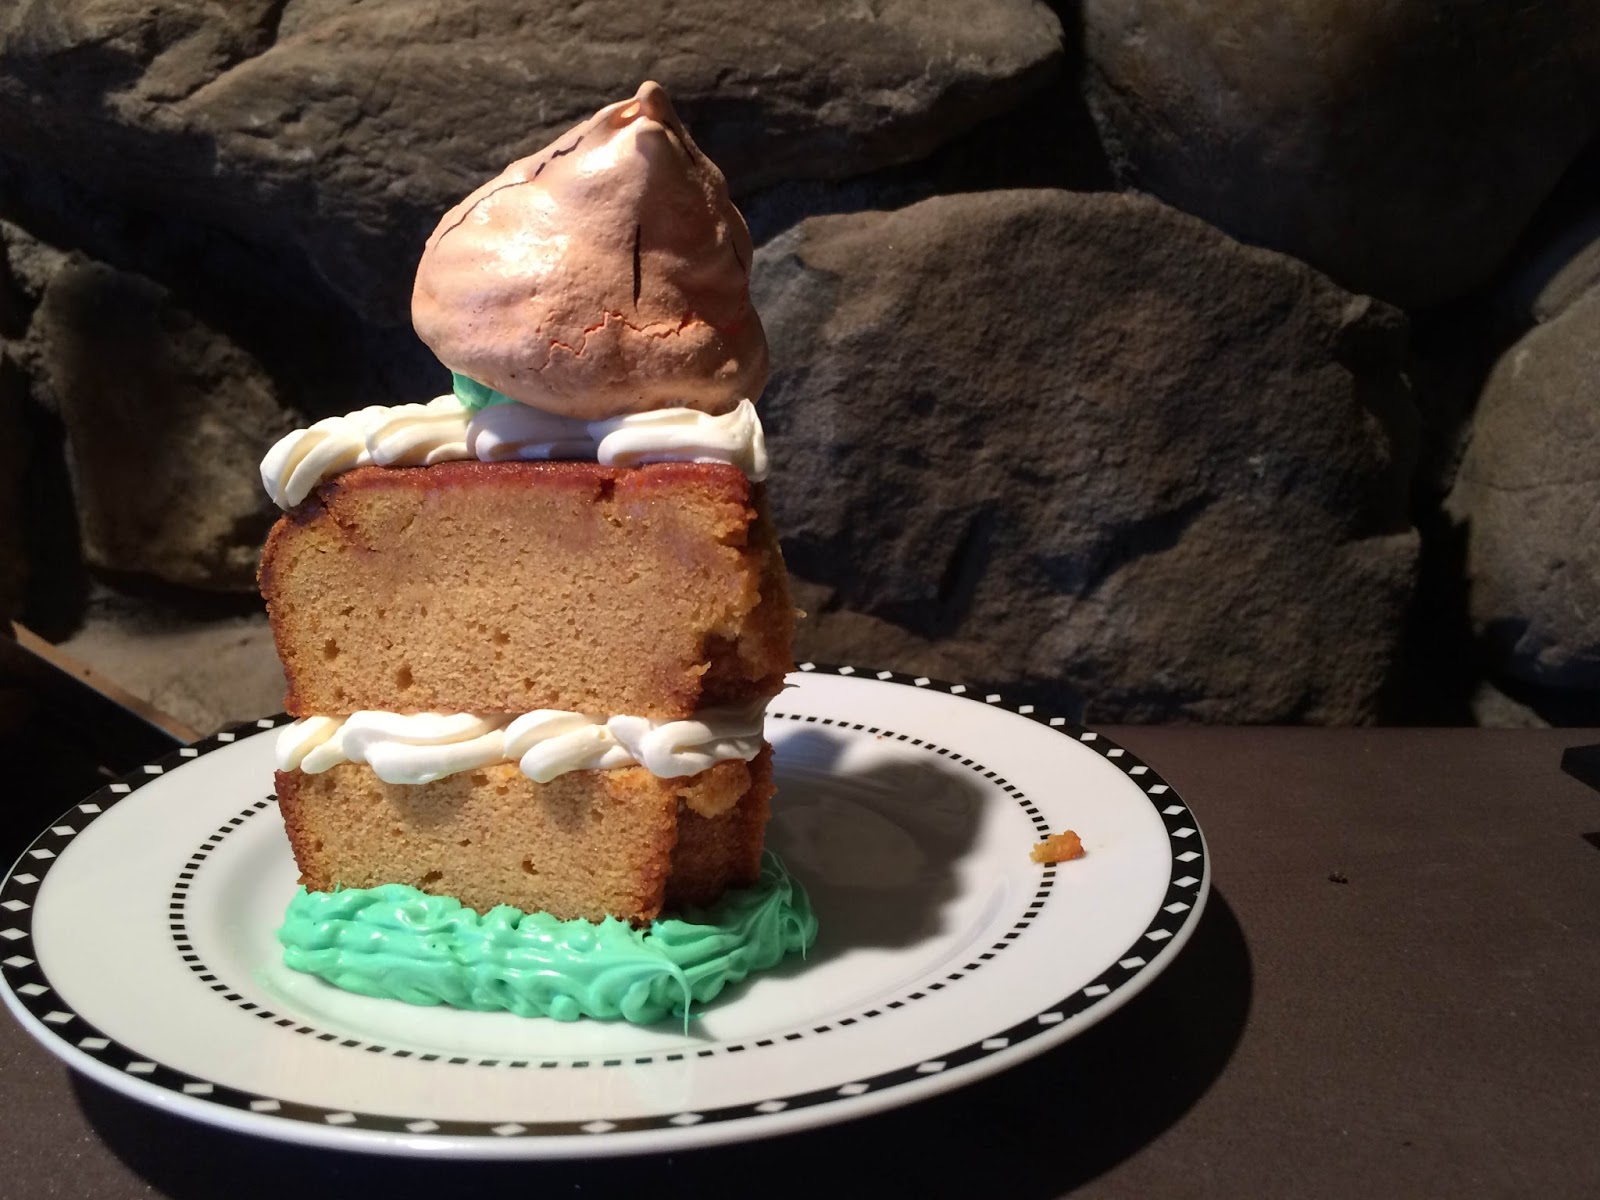
Delightful Delectables: Pumpkin Meringue

By: Amy Weinberg


'Tis the season for pumpkin, am I right? In a world where pumpkin rules the months of September, October, and November, blogging without this orange fruit almost felt blasphemous. 

I decided to take a swing at some meringue after seeing an adorable pumpkin meringue recipe online. I've only every experienced meringue on top of pies and didn't even know that it could stand on its own as a cookie. 

Meringue is not as complicated as one may think. With only 4 simple ingredients, the only headache you'll run into is the preparation. As is the case with most baking, patience is key. Patience will transform OK meringue into thick, stiff, beautiful peaks. Patience is something I do not have. 


Along with your patience, the other 4 ingredients you will need are 2 eggs,  1/4 teaspoon cream of tartar, 1/2 cup sugar, and food coloring. 

Step 1: Preheat your over to 275 degrees and place wax paper on a cookie sheet.

Step 2: Separate the yolk from the whites and mix the egg whites in a bowl with the cream of tartar. Beat with an electric mixer on medium-high until stiff peaks begin to form.

**This is when you will find out if you really have patience**

You will beat and beat and beat until you can hardly hold the mixer and you still may not see results. I can't even give you an accurate timeframe of how long it will take for the stiff peaks to form. Let's just say, don't attempt this recipe when you're pinched for time. 

Note: If there is ANY trace of yolk mixed in with the whites, you will not get those highly-covetted stiff peaks. 

Step 3: Slowly (1 teaspoon at a time) beat in all of the sugar until your mixture is stiff and glossy.

Step 4: Gently fold in your food dye and place your mixture into a pastry bag.


Step 5: Step 5 is piping your meringue onto the cookie sheet in a pumpkin form. This is where the recipe lost me. While my peaks were stiff and my meringue was holding, I had no idea how to pipe it into the form of a pumpkin. 

Step 6: Bake your cookies for 40 minutes. Once the 40 minutes is up, turn off your oven, but LEAVE IN your meringue for another hour. 


Some of you may be thinking "Hey Amy, your meringue came out looking not so pumpkin-like, can you eat them at least?"and the short answer is yes. Long answer? I personally put meringue I the same category as fondant: edible for all, enjoyable for few. 

In order to jazz these up a bit and avoid having the cookies look like orange-brown blobs, I decided to use them as a cake topper. I grabbed the closest My Grandma's Pumpkin Spice coffee cake and some cream cheese frosting and went to work. 


All in all, if someone can show me how to make a pumpkin out of meringue, I'll show you a pretty sweet cake topper. 

Monday, October 19, 2015

Delightful Delectables - Coffee Cake Granola!

By: Amy Weinberg


As the last of the ice finally melted from my car on my way to the gym this morning, I thought about what it felt like to be warm again. I thought about summer and all of the grilled coffee cake I was eating just last month. By the time I got to the gym, I was almost in tears.


But I prevailed.

Through tear soaked cheeks I exercised and asked “God, how can I make this better?” God simply responded, “Coffee Cake Granola”.


(Edit: no real lines of communication were drafted between God and I)

What You’ll Need:

1 ½ cups old fashioned oats
1 cup chopped pecans
1 cup Rice Krispie cereal
1/3 cup honey
¼ cup coconut oil (or EVOO)
2 tablespoons cinnamon
2 tablespoons brown sugar

And a coffee cake of your choice. I went with the banana walnut to add that extra banana element. 


Now let me put this recipe on pause for a quick pop-quiz.
What is the best part of our coffee cakes?

Correct answer: The streusel on top

Only other acceptable answer: All of it

Once you preheat your oven to 350 degrees and combine the above ingredients, it’s time to mix in the coffee cake. You’re going to want to break up the streusel, but not too much. The amount you mix in with your granola is up to you, but I used somewhere between ½ cup and 1 cup. Once all of your ingredients are combined, spread the mixture evenly across a baking sheet. Set your timer for 30 minutes and grab yourself a blanket because you’ve been in the bitter cold far too long.


Once your timer goes off and you regain feeling in your hands, it is time to let the granola cool. Some chunks may be more stuck together than others but the great taste is prevalent throughout. With this perfect post-workout snack in hand I am ready to curl up on the couch and dream about a warmer life!


Monday, September 21, 2015

Delightful Delectables - Fall Fondant Fun!

By: Amy Weinberg

Wednesday is the first day of Fall and there are mixed feelings flowing through the air. On one hand, Fall is awesome. The foliage is beautiful, the pies are delicious, and the beers have pumpkin in them. On the other hand: impending doom. Is there anything better than the autumn atmosphere?

Only acceptable answer: The atmosphere of never again having to experience this past winter.


You would be hard pressed to find a native New Englander who doesn’t love Autumn, but I think we still have some snow melting so it’s hard to get excited. BUT instead of focusing on the implementation of snow tunnel routes for transportation, let’s instead bask in all the glory that is Autumn. Apples, spices, pumpkins, squash, football, playoff baseball, corn mazes, Halloween, haunted houses, Thanksgiving, AND (my personal favorite) my 23rd birthday.
  
Autumn is everything it needs to be before the pale, frostbitten, ice-hell that is Winter.
Spencer-Peirce-Little Farm (Newbury, MA). Photo by Bethany Groff

I mentioned football because if there is one thing that the Northeast lacks, it is not football teams. The defending champion New England Patriots no doubt being the favorite here at My Grandma's. I, on the other hand, am the black sheep New Yorker who is a Giants and * gasp * Yankees fan. Needless to say, Autumn is fun around the office.

In the spirit of Autumn and football and My Grandma’s, I decided to kick off Week 1 with some cake pops shaped like NFL helmets. Now, you could say “Hey Amy, it’s already week 3…”, and you would be correct. I ran into some technical difficulties. Taste-wise? Superb. I simply rolled a mixture of Cinnamon No-Nut coffee cake and some buttercream icing into little balls. How could it taste anything less than amazing?

I would also like it to be known that this is not my first time making cake pops. They are tiny and they are delicious but they are not that easy to make. The problem I keep running into is that the lollipop sticks wont stick to the cake pop, making it really hard to dip into the melted chocolate. 

After hours of feverishly slaving in the kitchen, I came out with 4 cake pops with pipe-cleaner helmets that made them look like ducks.
But, like I said, they tasted great so that’s all that mattered.

I’m sure everyone knows the outcomes to both of these games by now. The Patriots unsurprisingly won by a touchdown and the Giants unsurprisingly did something stupid and lost the game.  

But because the cake pops didn't come out the way I would have hoped, the picture-lighting wasn’t great, and my team is the Giants, I held off on posting that blog. That left me with 10 lbs of fondant and no blog, so I decided to make a few more fall fondant figures. My ego took a hit with the cake pop football helmets but I think I redeemed myself with the witch’s hat and pumpkin.


I’m going to spend Fall 2015 eating coffee cake and choosing a new football team to root for. How are you going to spend it?